Dear Family & Friends

Dear Family & Friends

Welcome to our website! Thank you for visiting, we hope that you'll find all the information you need about us here. Please come back often, as we will be updating regularly!
It's hard to believe that we've been married for over 2 years now. We have been so busy planning our future, the time has just flown by. But we've been having a lot of fun with it, and thought we would set up this site to let family and friends keep up to date with our lives. Near or far or where ever you are you will know what we been up to.

For those of you who haven't yet heard our engagement story (there is probably not many of you left, as we love to tell it!), please visit "Our Engagement" to hear how Cody popped the question! If you want to learn a bit about how we met and came to be the fabulous couple you know and love, please visit "Our Story".

Wednesday, October 31, 2012

No bake Yummy Garnola Bars (whatever bars)


Ingredients:

1/3 cup brown sugar
¼ cup honey or corn syrup
4 tablespoons butter
2 cups oats
1 cup any ceral (my favorite is honey bunches of oats crunched up or just crunches crushed up)
½ teaspoon vanilla extract
3 tablespoons mini chocolate chips or what ever you wants

Directions:

1.Lightly grease an 8-inch square baking pan; set aside.
2. In a large bowl, stir the oats and rice cereal together; set aside. In a small saucepan, melt the brown sugar, honey, and butter together over medium-high heat until it begins to bubble. Reduce the heat to low and cook for 2 minutes. Remove from heat and stir in the vanilla extract.
3. Pour the melted mixture over the dry ingredients and mix well to moisten all ingredients. Pour the oat mixture into the prepared pan and press down to ensure that the ingredients are tightly compacted in the pan. Sprinkle the top evenly with the miniature chocolate chips and press down on the top lightly with the back of a spoon.
4. Cool at room temperature for at least 2 hours, or until the chocolate chips are set before cutting into bars. Wrap in plastic wrap or keep in an airtight container and store at room temperature for up to 5 days.


Friday, August 31, 2012

Chicken Pot Pie Muffins


Chicken Mixture

1 tablespoon vegetable oil
1 lb boneless skinless chicken breasts, cut into bite-size pieces
1 medium onion, chopped (1/2 cup)
1/2 cup chicken broth
1 cup frozen peas and carrots
1/2 teaspoon salt
1/4 teaspoon pepper
1/4 teaspoon ground thyme
1 cup shredded Cheddar cheese (4 oz)

Baking Mixture

1/2 cup Original Bisquick® mix
1/2 cup milk
2 eggs 
  • 1 Heat oven to 375°F. Spray 12 regular-size muffin cups with cooking spray.
  • 2 In 10-inch nonstick skillet, heat oil over medium-high heat. Cook chicken in oil 5 to 7 minutes, stirring occasionally, until chicken is no longer pink in center. Add onion and chicken broth; heat to simmering. Add frozen vegetables and seasonings. Heat until hot, stirring occasionally until almost all liquid is absorbed. Cool 5 minutes; stir in cheese.
  • 3 In medium bowl, stir baking mixture ingredients with whisk or fork until blended. Spoon 1 scant tablespoon baking mixture into each muffin cup. Top with about 1/4 cup chicken mixture. Spoon 1 tablespoon baking mixture onto chicken mixture in each muffin cup.
  • 4 Bake 25 to 30 minutes or until toothpick inserted in center comes out clean. Cool 5 minutes. With thin knife, loosen sides of pies from pan; remove from pan and place top sides up on cooling rack. Cool 10 minutes longer, and serve.
 

Thursday, August 23, 2012

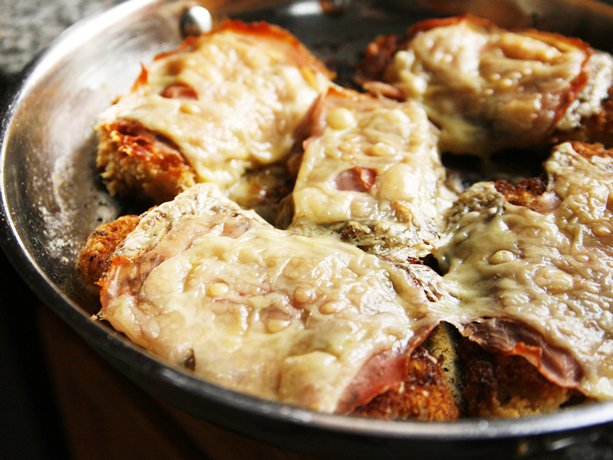
Chicken Cordon Bleu


 One Skillet Inside-Out Chicken Cordon Bleu
 

 Ingredients


1/4 cup oil
1/2 cup  all-purpose flour
Salt and pepper to taste
2 eggs
1 cup Italian crispy bread crumbs (half 8-oz box)
1 lb thin sliced chicken breasts, rinsed, patted dry
8 very thin slices Swiss cheese (about 1/2 oz each)
4 slices deli cooked ham 


 Cooking:

  •  Heat oven to 400°F. In 10-inch ovenproof skillet, heat oil over medium heat. Meanwhile, in shallow bowl, stir together flour, salt and pepper. In second shallow bowl, beat egg. In third shallow bowl, place bread crumbs
 
  • When oil is hot, coat all sides of each chicken breast slice with flour mixture, then egg and bread crumbs. Place in skillet; cook 4 to 5 minutes on each side or until golden brown. If necessary, cook in 2 batches.
 
  •  Once all chicken is golden, arrange all slices in skillet. Place 1 cheese slice on each chicken breast slice. Top each with 1 ham slice and second cheese slice


  •  Bake 12 to 15 minutes or until cheese is hot, bubbly and golden brown, and chicken is no longer pink in center.

I hope enjoy!!!!


Saturday, March 10, 2012

homemade Coco Nutty Cake-Coconut Cake

 So for y'all who like coconut cake this is cake made from scratch.  :) If you would like to use a boxed cake its best to use a white and add 1 teaspoon of vanilla in the mixture. You probably can find coconut icing as well, But for my lazy days I like to just grab a vanilla icing and use half teaspoon of coconut extract. Well enjoy


Ingredients
  • Cake
  • 1 c. (2 sticks) Unsalted Butter, room temperature
  • 2 c. Granulated Sugar
  • 4 Eggs
  • 3 c. Self-Rising Flour
  • 1 c. Milk (she suggested coconut milk but I had whole milk so I used that)
  • 1 T. Pure Vanilla
  • 2 t. Coconut Extract
  • Coconut Filling
  • 3/4 c. Sugar
  • 1 c. Sour Cream
  • 4 T. Milk
  • 1 t. Pure Vanilla
  • 1/2 c. Flaked, Sweetened Coconut
  • 7-Minute Frosting
  • 1 1/2 c. Granulated Sugar
  • 1 T. White Corn Syrup
  • 1/8 t. Salt
  • 1/3 c. Cold Water
  • 2 Egg Whites
  • 2 t. Pure Vanilla
  • 3 c. Flaked, Sweetened Coconut
Instructions
For the Cake
  1. Preheat oven to 350 degrees. Grease and flour 3, 9-inch round cake pans and line with parchment paper.
  2. In the bowl of an electric mixer, cream butter until fluffy. Add sugar and continue to beat on medium-high speed for 6-8 minutes. Add eggs, one at a time, beating well after each addition. Add flour and milk alternately to creamed mixture, beginning and ending with flour. Add vanilla and continue to beat until just mixed. Divide batter equally among prepared pans. Level batter in each pan by holding pan 3 or 4 inches above counter, then dropping it flat onto counter. Do this several times to release air bubbles and assure you of a more level cake. Bake for 25 to 30 minutes (mine took about 27) or until a toothpick inserted in the middle comes out clean. Cool in pans for 5 to 10 minutes and then invert cakes onto cooling rack and let cool completely (I actually cooled mine completely in the pans…inside my refrigerator. :) I was in a hurry.).


For the Coconut Filling
  1. In a medium bowl, stir together sugar, sour cream, milk and vanilla until sugar is completely dissolved. Add coconut and stir to combine.
To Assemble the Cake
  1. Place one cake layer on a cake stand or large plate. (I like to torte the top of my cakes to get them even but this is not a must if you prefer not to do it) Poke holes in cake approximately 1-inch apart with the end of a wooden spoon or chopsticks (which is what I used) until entire cake has been poked. Spread with 1/3 of the filling mixture. Top with second layer, repeat process. Top with last layer and repeat process again. Place in refrigerator while you make the frosting.


For the 7-Minute Frosting
  1. In a stainless steel bowl over a large saucepan of simmering water (fill saucepan about halfway, you don’t want the water to touch the bottom of the bowl), place the egg whites, sugar, corn syrup, salt and cold water. With a handheld electric mixer beat the mixture for 4 minutes on low speed. Increase the speed to high and continue to beat for another 6-7 minutes or until the icing is shiny and satiny with soft peaks. Remove from heat, add the vanilla extract and continue to beat on high speed for another 3-4 minutes or until the frosting is thick.
  2. Frost cake immediately. It is easiest to start by frosting the top of the cake first and then working the frosting down the sides. Press the 3 cups of coconut onto the top and sides of the cake. Refrigerate until ready to serve.
  3. serves 20